Speed Port Cost Comment 10 Mbps 100 Ethernet 20 Mbps 56 EtherChannel 30 Mbps 47 EtherChannel 40 Mbps 41 EtherChannel 50 Mbps 35 EtherChannel 54 Mbps 33 802.11 wireless 60 Mbps 30 EtherChannel 70 Mbps 26 EtherChannel 80 Mbps 23 EtherChannel 100 Mbps 19 Fast Ethernet 200 Mbps 12 Fast EtherChannel 300 Mbps 9 Fast EtherChannel 400 Mbps 8 Fast EtherChannel 500 Mbps 7 Fast EtherChannel 600 Mbps 6 Fast EtherChannel 700 Mbps 5 Fast EtherChannel 800 Mbps 5 Fast EtherChannel 1 Gbps 4 Gigabit Ethernet 2 Gbps 3 Gigabit EtherChannel 10 Gbps 2 10G Ethernet 20 Gbps 1 20G EtherChannel 40 Gbps 1 40G EtherChannel

Wednesday, April 4, 2018
Default Observed on Cisco Switches
Friday, March 23, 2018
OSPF Timers
| no | Broadcast | non-broadcast | point-to-point | point-to-multipoint | point-to-mutlipoint non-broadcast |
|---|---|---|---|---|---|
| Hello Interval | 10 | 30 | 10 | 30 | 30 |
| Dead Interval | 40 | 120 | 40 | 120 | 120 |
| Poll Interval | 120 | 120 | 120 | 120 | 120 |
| Retransmit-Interval | 5 | 5 | 5 | 5 | 5 |
| Transmit-Link-Delay-Interval | 1 | 1 | 1 | 1 | 1 |
Monday, February 19, 2018
12 Best Bootable USB Flash DriveCreation Tools / Software
12 Best Bootable USB Flash DriveCreation Tools / Software
Bootable USB drive creation tools to install new operating system from USB. Prepare the pen drive for single operating system or multiple OS on single USB. You can also save user files along side of the bootable partition. Its 2017 and no one uses the traditional DVD.
Most of the Linux OS would be tested by creating a ‘Live’ disk which gives, complete experience of the full operating system without installing anything on your hard disk.
Windows 7, 8.1 and now Windows 10 can be easily installed from bootable USB. If your mother board is comparatively new, you may have to deal with the UEFI or the legacy BIOS if your computer is not that new. Both way, you can easily create bootable USB drive using all of the listed software here.

1. Rufus
Rufus is a simple and easy to use. It automatically detects your USB flash drive and capacity so you can easily identify which device you are formatting. The bootable USB drive can be created for newer hardware supporting UEFI or for legacy BIOS. You only have to select proper options from the list.

Steps to create bootable flash drive
The type bootable USB drive you are creating depends on motherboard you are using.
For Old Motherboards Using Legacy BIOS
➤ First select the ISO image file, from the disk icon behind 'create a bootable disk using' option. ( Do this first only because, if you select other options firs, and the file later, the settings go to default after selecting the ISO file. May be a bug )
Select the target drive and file system (For Windows keep it NTFS).
➤ Select 'MBR partition scheme for BIOS or UEFI' from partition scheme and target system type.
➤ Keep the file system, cluster size as it is or you can change it to NTFS for Windows and exFAT for Linux.
➤ You can give appropriate name to the resulting bootable drive.
➤ ISO image on your hard disk must be a valid bootable image because Rufus scan the image before you load it.
➤ Click start button and wait for the process to complete. This may take up to 20 minutes.
For New Motherboards Using UEFI
➤ UEFI motherboards most of the time need 64 bit Windows. Else you will get 'Could not locate '\dfi\boot\bootx64.efi: [14] Not found' error. If you get this error, you must need 64 bit Windows version. The 7th generation Intel CPU do not support Windows 7 or older. You must have Windows 10.
➤ Select the ISO image file of OS you want burn.
➤ Select 'GPT partition scheme for UEFI' from partition scheme and target system type.
➤ NTFS as file system .
If you create bootable USB using MBR scheme, you may get an error like 'Windows can not be installed. The partition is GPT type.
Carefully check the options as above before you hit the start button.
💧 Download Rufus
2. WinToBootic
 Again a basic tool with minimum option. Just drag and drop your .ISO image or click on ‘drop ISO here’ icon.
It will auto detect your USB media.
Hit the ‘Do It’ button, WinToBootic will do the everything rest.
+ minimal interface, run without installation.
- Does not support Linux
💧 Download WinToBootic
3. RMPrepUSB
It's all in one tool. Features come with cluttered interface. If you don't know what are you doing, don't use it. I personally do not recommend it if you want a simple bootable USB to install new operating system.
RMPrepUBS is specialized in creating multiple partition in a single USB drive. You can install multiple ISO of different OS or save user files along side of the bootable USB.
 The special feature of RMPrepUSB is you can create a partition in USB drive just like you do on your hard disk making it more useful for saving files plus using the same drive as a separate folder for storing files.
This keeps your files separate from the operating system files.
For advanced users.
Difficult to use
Create ISO from USB drive.
Edit the hard drive grub or syslinux boot loader.
Test speed of the USB drive.
Support all OS.
💧 Download RMPrepUSB
4. Universal USB Installer
 Specialized tool for creating bootable live Linux OS. It has predefined list of most of the Linux distributions available. Give path of ISO image and USB flash drive you want to boot from. Prepare a Live antivirus rescue disk using it. A special option for this is also given for reuse CD.
+ Specialized menu for Linux, also support Window 7
💧 Download Universal USB Installer
5. YUMI
 You can download the ISO of your favorite OS. YUMI have large collection of free OS based on Linux and other free OS projects. Just select what you want and YUMI will give you the direct download link for it.
The interface is quite easy to use and useful.
💧 Download YUMI
6. UNetbootin
 This tool is an exact clone of Universal USB installer or you can also say Universal USB installer is a clone of UNetbootin.
Create a bootable USB for any Linux distribution.
If you are not using Windows as your host operating system, then UNetbootin is an option to go for. UNetbootin is available for Linux, iOS and Windows.
So if you are using Linux, most of the software's listed here will not run where UNetbootin will come to help.
💧 Download UNetbootin
7. Linux Live USB Creator (LiLi)
LiLi is one more software used to make bootable USB. The special feature called built-in Vitalization allow users to run the installed Linux operating system without restarting the Windows which are an exclusive feature of LiLi.

If you are concerned only about Linux you must go for this.
💧Download LiLi Creator
8. WinSetUp From USB

This is also a tool for those who want to install multiple operating system on one USB device.
WinSetup From USB let you install Windows XP, Windows Vista, Windows 2000, Windows 7, Windows 10, any Linux distribution.
When you prepare the USB drive using ‘WinSetup From USB’ you will be presented with the list of operating systems installed on the thumb drive and select the preferred operating system to boot from.
Though the interface is simple, non expert users may find it difficult to use.
💧Download WinSetUp From USB
9. WinUSB Maker
This is more that just a bootable USB creation tool, though you can use it for that also. This is a special tool that will allow you to clone hard disk partition on your portable memory device like USB thumb drive or portable hard disk.
WinUSB maker copies exact partition of your local hard disk along with the boot files and file structure. You can also restore the saved partition from the USB device to your hard disk making it useful as a backup tool. This is a must have tool for everyone. We have already discussed about this earlier here.
💧 Download WinUSB Maker
10. XBoot
This is more than just a bootable USB maker. You can create a rescue CD or a disk having multiple operating systems or tools like antivirus rescue CD. It combines multiple tools in ISO image making it more useful than just a USB creating tool. XBoot can create ISO image from files and then write these files to USB drive for booting or installation.
 💧 Download XBoot here
11. Windows Bootable Image Creator
This is a straight forward and ultra small tool that accomplishes its job as you expect. It has a super simple interface and minimum buttons to avoid confusion of new users. This is a tool from AskVG.
 There are only basic buttons and only one task to do. Just create a bootable USB driveto install or try new operating systems. I wonder how it is so small and light. It is just 160KB in size.
💧 Download Windows Bootable Image Creator
12. Other Tools
➤There are other tools like Novicorp WinToFlash, Passcape ISO Burner, Windows official USB disc creation tool, Ubuntu startup disc creator and Flash Boot.
➤Novicorp WinToFlash is also a tool that will help you to recover deleted boot loader apart from creating a bootable flash drive.
➤Passcape ISO burner is also a simple and small utility to create bootable USB drive.
Windows official USB creation tool is an official tool to create a bootable USB drive to install downloaded Windows 7 and Windows 8 ISO images without burning it to traditional discs.
➤The Ubuntu start up disc is also a tool for Linux fan boys.
➤FlashBoot is a bit tool having around 24 MB is download size. It has more options than any other tool, but is actually a paid tool, but anyone can use it for free.
➤If you want to try out Google Chromium Operating system, you have to use a recommended open source tool Image Writer for Windows. It is also a small but useful too without any garbage features. A simple and straight tool.
Verdict:
⏩ 'Rufus' is best of everybody.
⏩ 'LiLi' is the best choice for Linux specialists.
⏩ 'WinSetup From USB' is for installing multiple OS in one USB drive.
⏩ 'RMPrep USB' is for making partition in USB drive along with Windows.
⏩ If you want to clone a complete partition with OS 'WinUSB Maker' is the best choice.
The USB drive is Easy to create, erase and reuse. Can install multiple OS on same USB at a time. Faster booting and installation speed. Portable and easy to handle.Preparing the Bootable USB drive is easy and straightforward. These 12 software can make your device ready within 5 minutes and 2 clicks.
Most of the Linux OS would be tested by creating a ‘Live’ disk which gives, complete experience of the full operating system without installing anything on your hard disk.
Windows 7, 8.1 and now Windows 10 can be easily installed from bootable USB. If your mother board is comparatively new, you may have to deal with the UEFI or the legacy BIOS if your computer is not that new. Both way, you can easily create bootable USB drive using all of the listed software here.
1. Rufus
Rufus is a simple and easy to use. It automatically detects your USB flash drive and capacity so you can easily identify which device you are formatting. The bootable USB drive can be created for newer hardware supporting UEFI or for legacy BIOS. You only have to select proper options from the list.
Steps to create bootable flash drive
The type bootable USB drive you are creating depends on motherboard you are using.
For Old Motherboards Using Legacy BIOS
➤ First select the ISO image file, from the disk icon behind 'create a bootable disk using' option. ( Do this first only because, if you select other options firs, and the file later, the settings go to default after selecting the ISO file. May be a bug )
Select the target drive and file system (For Windows keep it NTFS).
➤ Select 'MBR partition scheme for BIOS or UEFI' from partition scheme and target system type.
➤ Keep the file system, cluster size as it is or you can change it to NTFS for Windows and exFAT for Linux.
➤ You can give appropriate name to the resulting bootable drive.
➤ ISO image on your hard disk must be a valid bootable image because Rufus scan the image before you load it.
➤ Click start button and wait for the process to complete. This may take up to 20 minutes.
For New Motherboards Using UEFI
➤ UEFI motherboards most of the time need 64 bit Windows. Else you will get 'Could not locate '\dfi\boot\bootx64.efi: [14] Not found' error. If you get this error, you must need 64 bit Windows version. The 7th generation Intel CPU do not support Windows 7 or older. You must have Windows 10.
➤ Select the ISO image file of OS you want burn.
➤ Select 'GPT partition scheme for UEFI' from partition scheme and target system type.
➤ NTFS as file system .
If you create bootable USB using MBR scheme, you may get an error like 'Windows can not be installed. The partition is GPT type.
Carefully check the options as above before you hit the start button.
💧 Download Rufus
2. WinToBootic
It will auto detect your USB media.
Hit the ‘Do It’ button, WinToBootic will do the everything rest.
+ minimal interface, run without installation.
- Does not support Linux
💧 Download WinToBootic
3. RMPrepUSB
It's all in one tool. Features come with cluttered interface. If you don't know what are you doing, don't use it. I personally do not recommend it if you want a simple bootable USB to install new operating system.
RMPrepUBS is specialized in creating multiple partition in a single USB drive. You can install multiple ISO of different OS or save user files along side of the bootable USB.
This keeps your files separate from the operating system files.
For advanced users.
Difficult to use
Create ISO from USB drive.
Edit the hard drive grub or syslinux boot loader.
Test speed of the USB drive.
Support all OS.
💧 Download RMPrepUSB
4. Universal USB Installer
+ Specialized menu for Linux, also support Window 7
💧 Download Universal USB Installer
5. YUMI
Yumi, short for Your Universal Multiboot Installer. YUMI allow you to prepare the bootable USBdrive multiple operating system in one USB drive without formatting it.
The interface is quite easy to use and useful.
💧 Download YUMI
6. UNetbootin
Create a bootable USB for any Linux distribution.
If you are not using Windows as your host operating system, then UNetbootin is an option to go for. UNetbootin is available for Linux, iOS and Windows.
So if you are using Linux, most of the software's listed here will not run where UNetbootin will come to help.
💧 Download UNetbootin
7. Linux Live USB Creator (LiLi)
LiLi is one more software used to make bootable USB. The special feature called built-in Vitalization allow users to run the installed Linux operating system without restarting the Windows which are an exclusive feature of LiLi.
If you are concerned only about Linux you must go for this.
💧Download LiLi Creator
8. WinSetUp From USB
This is also a tool for those who want to install multiple operating system on one USB device.
WinSetup From USB let you install Windows XP, Windows Vista, Windows 2000, Windows 7, Windows 10, any Linux distribution.
When you prepare the USB drive using ‘WinSetup From USB’ you will be presented with the list of operating systems installed on the thumb drive and select the preferred operating system to boot from.
Though the interface is simple, non expert users may find it difficult to use.
💧Download WinSetUp From USB
9. WinUSB Maker
This is more that just a bootable USB creation tool, though you can use it for that also. This is a special tool that will allow you to clone hard disk partition on your portable memory device like USB thumb drive or portable hard disk.
WinUSB maker copies exact partition of your local hard disk along with the boot files and file structure. You can also restore the saved partition from the USB device to your hard disk making it useful as a backup tool. This is a must have tool for everyone. We have already discussed about this earlier here.
💧 Download WinUSB Maker
10. XBoot
This is more than just a bootable USB maker. You can create a rescue CD or a disk having multiple operating systems or tools like antivirus rescue CD. It combines multiple tools in ISO image making it more useful than just a USB creating tool. XBoot can create ISO image from files and then write these files to USB drive for booting or installation.
11. Windows Bootable Image Creator
This is a straight forward and ultra small tool that accomplishes its job as you expect. It has a super simple interface and minimum buttons to avoid confusion of new users. This is a tool from AskVG.
💧 Download Windows Bootable Image Creator
12. Other Tools
➤There are other tools like Novicorp WinToFlash, Passcape ISO Burner, Windows official USB disc creation tool, Ubuntu startup disc creator and Flash Boot.
➤Novicorp WinToFlash is also a tool that will help you to recover deleted boot loader apart from creating a bootable flash drive.
➤Passcape ISO burner is also a simple and small utility to create bootable USB drive.
Windows official USB creation tool is an official tool to create a bootable USB drive to install downloaded Windows 7 and Windows 8 ISO images without burning it to traditional discs.
➤The Ubuntu start up disc is also a tool for Linux fan boys.
➤FlashBoot is a bit tool having around 24 MB is download size. It has more options than any other tool, but is actually a paid tool, but anyone can use it for free.
➤If you want to try out Google Chromium Operating system, you have to use a recommended open source tool Image Writer for Windows. It is also a small but useful too without any garbage features. A simple and straight tool.
Verdict:
⏩ 'Rufus' is best of everybody.
⏩ 'LiLi' is the best choice for Linux specialists.
⏩ 'WinSetup From USB' is for installing multiple OS in one USB drive.
⏩ 'RMPrep USB' is for making partition in USB drive along with Windows.
⏩ If you want to clone a complete partition with OS 'WinUSB Maker' is the best choice.
Thursday, February 8, 2018
Windows Server 2016: NIC Teaming functionality
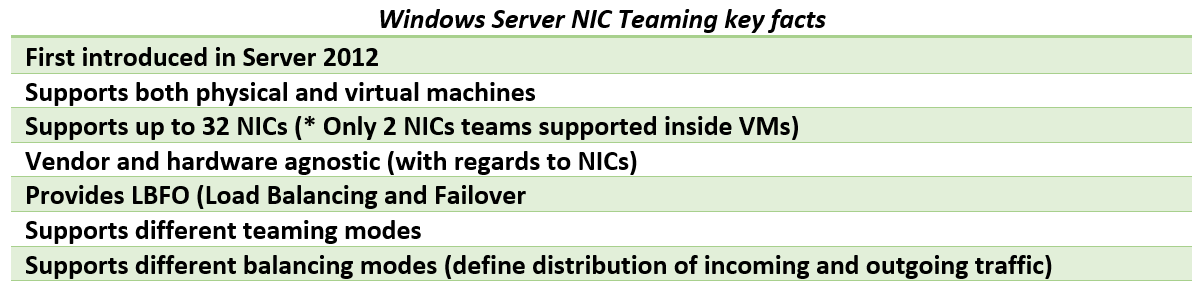
NIC teaming is not something we got with Windows Server 2016 but I just find it interesting to review this functionality as we have it in the current iteration of Windows Server, as usual, touching a bit on basics and history of this feature.
NIC teaming feature reached its maturity in Server 2012 R2 and there are (almost) no major changes in this department in Server 2016, yet if you just starting out with a practical use of NIC teaming on prepping for any related Microsoft exam you may find it useful to review this feature thoroughly.
Link Teaming was first introduced as OOB feature in Windows Server 2012 with intent to add simple, affordable traffic reliability and load balancing for server workloads. First-hand explanations of pros of this feature by Don Stanwyck, who was the program manager of the NIC teaming feature back then can be found here. But long story short, this feature gained special importance because of an arrival of virtualization and high-density workloads: knowing how many services can be run inside of multiple VMs hosted by Hyper-V host you just cannot afford connectivity loss which impacts all of them. This is why we got NIC teaming: to safeguard against the range of failures from plain accidental network cable disconnect to NIC or switch failures. The same workflow density pushes for increased bandwidth too.
In a nutshell, Windows Server NIC teaming provides hardware-independent bandwidth aggregation and transparent failover suitable both for physical and virtualized servers. Before Server 2012 you had to rely on hardware/driver based NIC teaming which obliged you to buy NICs from the same vendor and rely on third party software to make this magic happen. This approach had some major shortcomings, e.g.: you were not able to mix NICs from different vendors in the team, and each vendor has its own approach to management of teaming and such implementations also lacked remote management features – basically it was not simple enough. Once Windows Server NIC teaming was introduced hardware specific teaming solutions fell out of common use as it no longer makes sense for hardware vendors reinvent the wheel/offer functionality which is better handled by OOB Windows feature which simply supports any WHQL certified Ethernet NIC.
Like I said earlier, Windows Server 2016 have not introduced any major changes to NIC Teaming except for Switch Embedded Teaming which is positioned to be the future way for teaming in Windows. Switch Embedded Teaming or SET is an alternative NIC Teaming solution that you can use in environments that include Hyper-V and the Software Defined Networking (SDN) stack in Windows Server 2016. SET integrates some NIC Teaming functionality into the Hyper-V Virtual Switch.
On the LBFO teaming side Server 2016 added ability to change LACP timer between a slow and fast one – which may be important for those who use Cisco switches (there seems to be an update allowing you to do the same in Server 2012 R2).
Gains and benefits of Windows Server NIC teaming are somewhat obvious, but what can give you a hard time (especially if you in for some Microsoft exams) is attempt to wrap your head around all possible NIC teaming modes and their combinations. So let’s see if we can sort out all these teaming modes which naturally can be then configured both via GUI and PowerShell.
Let’s start with teaming modes as it is first step/decision to make when configuring NIC teaming. There are three teaming modes to choose from: Switch Independent and two Switch Dependent modes – LACP and static.
Switch Independent mode means we don’t need to configure anything on the switch and everything is handled by Windows Server. You can attach your NICs to different switches in this mode. In this mode all outbound traffic will be load balanced across the physical NICs in the team (exactly how will depend on load balancing mode), but incoming traffic won’t be load balanced as in this case switches are unaware about NICs team (this is important distinction which sometimes takes a while to spot especially if you frame your question to Google as something like “LACP VS switch independent performance” or something along these lines).
Switch dependent modes require configuring a switch to make it aware of NICs team and NICs have to be connected to the same switch. Once again, quoting official documentation: “Switch dependent teaming requires that all team members are connected to the same physical switch or a multi-chassis switch that shares a switch ID among the multiple chassis.”
There are a lot of switches allowing you to try this at home, for example, I have quite affordable yet good D-Link DGS-1100-18 switch from DGS-1100 Series of their Gigabit Smart Switches. This switch has support for 802.3ad Link Aggregation supporting up to 9 groups per device and 8 ports per group and costs around 100 EUR at this point in time.
Static teaming mode requires us to configure the individual switch ports and connect cables to specific switch ports and this is why it is called static configuration: we assign static ports here and if you connect a cable to different port you’ll break your team.
LACP stands for Link Aggregation Control Protocol and essentially it is the more dynamic version of switch dependent teaming meaning that with if you configure the switch rather than individual ports. Onc the switch is configured it becomes aware about your network team and handles dynamic negotiation of the ports.
In both of switch dependent teaming modes your switches aware about NICs team and hence can load balance incoming network traffic.
To control how load distribution handled we have a range of load balancing modes (you can think about them as “load balancing algorithms”) which includes: address hash, Hyper-V port and Dynamic mode which was first introduced in Server 2012 R2.
Address hash mode uses attributes of network traffic (IP address, port and MAC address) to determine to which specific NIC traffic should be sent.
Hyper-V port load balancing ties a VM to specific NIC in the team, which may work well for Hyper-V host with numerous VMs on it so that you distribute their NIC traffic across multiple NICs in your team but if you have just a few VMs this may not be your best choice as it leads to underutilization of NICs within the team.
Dynamic is default option introduced in Server 2012 R2 which is recommended by Microsoft and gives you advantages of both previously mentioned algorithms: it uses address hashing for outbound and Hyper-V port balancing for inbound with additional logic built into it to rebalance in case of failures/traffic breaks within the team.
So now we covered things you supposed to know to make informed NIC teaming configuration decisions or take Microsoft exams, let’s have a look at practical side of configuring this.
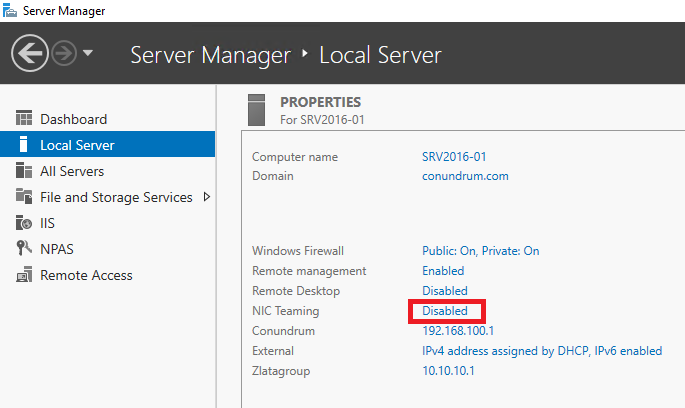
GUI way to manage NIC teams available through Server Manager – you just click on Disabled link for NIC teaming to start with configuration process:
This will get you into NIC teaming console where things are straightforward and easy (providing you read the first half of the article:
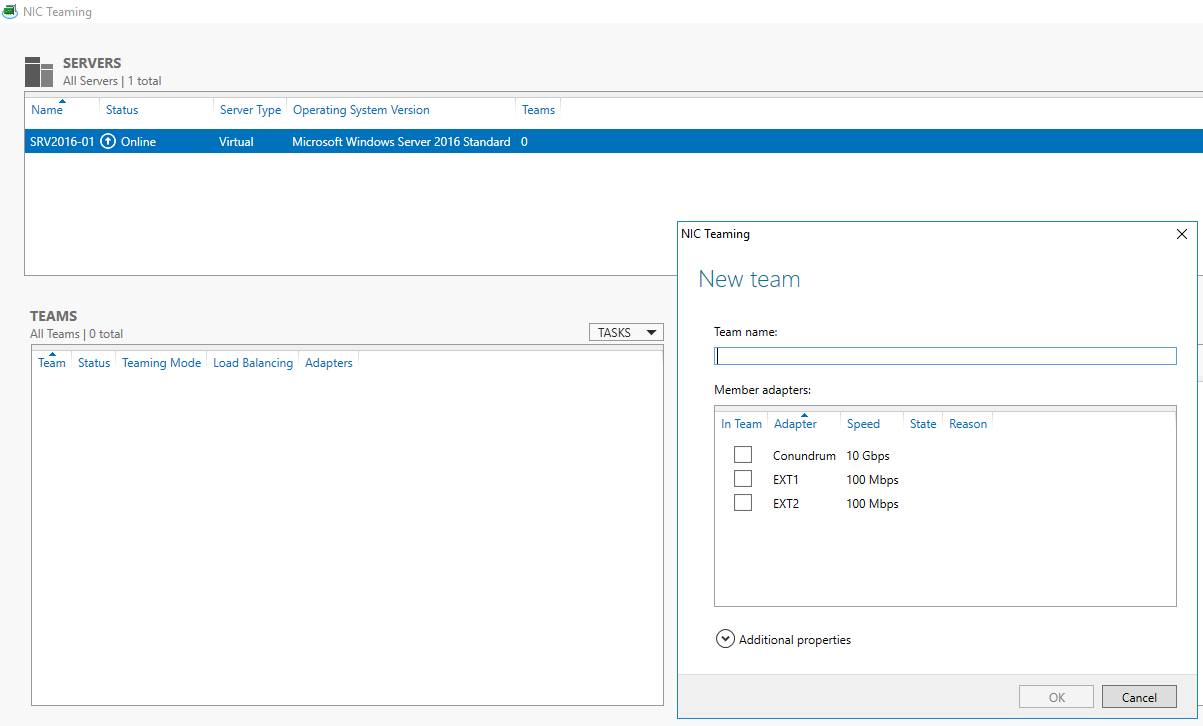
In case you are doing this VM you may notice that your choices in Additional properties of New team dialog may be limited to switch independent mode and Address Hash distribution mode, so that two first drop downs are greyed out/inactive – this simply means that we have to review what’s supported and required when it comes to NIC teams inside VMs. From supportability point of view, only two member NIC teams are supported by Microsoft, and NICs participating in the team have to be connected to two different external Virtual Switches (which means different physical adapter). And with all these requirements met inside VMs NIC Teams must have their Teaming mode configured as Switch Independent and Load Balancing mode for the NIC Team in a VM must be configured with the Address Hash distribution mode.
After looking at these limitations it is tempting to say that it is better to go for configuring NIC teaming on Hyper-V host itself and just don’t use it inside VM. But I bet there may be the use case for doing teaming inside of VM – just can’t think of anything right now (if you do – just let me know in comments to this blog post).
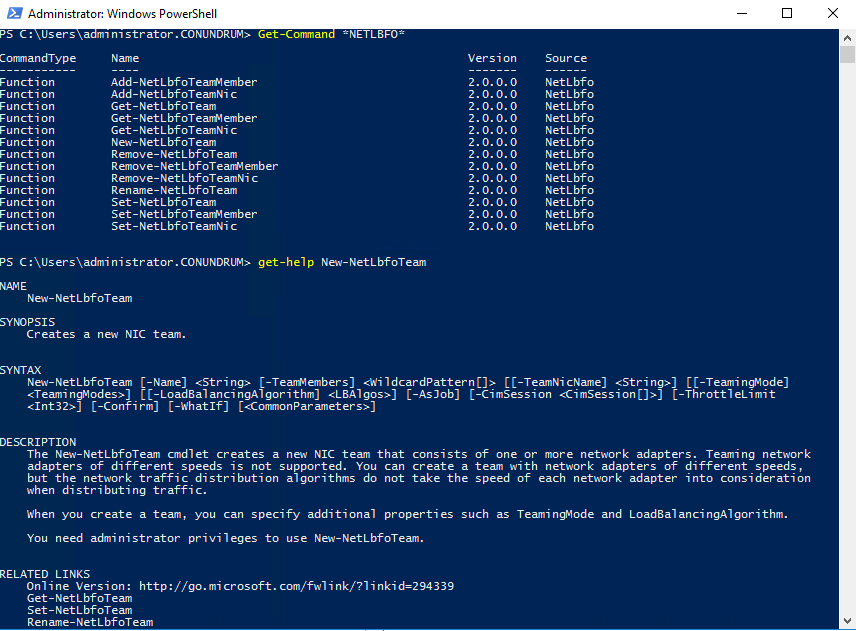
In case you want to manage NET teaming via PowerShell you can get all required information in NetLbfo Module documentation on TechNet, or just issue Get-Command *NETLbfo* and further on leverage Get-Help as necessary:
I think this blog post provided enough information to get you started with NIC teaming especially if you have not read anything on it just yet. If you had known most of the stuff already, maybe you more clear on Switch Independent VS Switch Dependent dilemma now. All in all, in current versions of Windows Server Microsoft did a great job making this functionality as easy to use as possible and pushing it forward in GUI so that it sits right in Server Manager, literally asking you to set it up. In case you want to go into details with that I would recommend you great document from Microsoft – “Windows Server 2016 NIC and Switch Embedded Teaming User Guide” which will give you complete and detailed guidance about all facets of NIC teaming in Server 2016 (old versions of this document are still available too both for 2012 and 2012 R2 versions of Windows, and current Microsoft documentation on NIC teaming is also very good).
Saturday, February 3, 2018

Subscribe to:
Comments (Atom)
-
 12 Best Bootable USB Flash Drive Creation Tools / Software Bootable USB drive creation tools to install new operating system from ...
 -
NIC teaming is not something we got with Windows Server 2016 but I just find it interesting to review this functionality as we have it in ...
-
Speed Port Cost Comment 10 Mbps 100 Ethernet 20 Mbps 56 EtherChannel 30 Mbps 47 EtherChannel 40 Mbps 41 EtherChannel 50 Mbps 35 E...
